
Guides
How to Import BankFlow Transactions into QuickBooks Online or Desktop
Export your BankFlow transactions as a QuickBooks-ready file, then bring them into QuickBooks Online or Desktop without connecting a bank feed.
Last verified in BankFlow on August 20, 2026.
Last verified in BankFlow on August 20, 2026.
What This Guide Covers
Getting your BankFlow transactions into QuickBooks is two separate steps: exporting a QuickBooks-ready file from BankFlow, and importing that file into QuickBooks. The BankFlow side is the same for everyone; the QuickBooks side differs depending on whether you use QuickBooks Online or Desktop, so this guide covers both.
Before You Start
- QuickBooks Online accepts a manual file upload (CSV, QFX, or QBO) through its Bank Transactions screen. QuickBooks Desktop uses a different mechanism called Web Connect, which specifically expects a
.QBOfile. - BankFlow's QuickBooks export is fixed-schema by design: date, description, and a signed amount, only, which is what both QuickBooks import paths expect. There's no column mapping step because there's nothing to map.
- QuickBooks Desktop requires you to be signed in to an Intuit Account inside the desktop app before it will import a Web Connect file.
Step 1: Export from BankFlow
In BankFlow, open Transactions, set whatever filters or selection you want exported, and click Export. Choose the QuickBooks format (or OFX, if your accounting tool expects that name instead, they carry the same fixed schema).
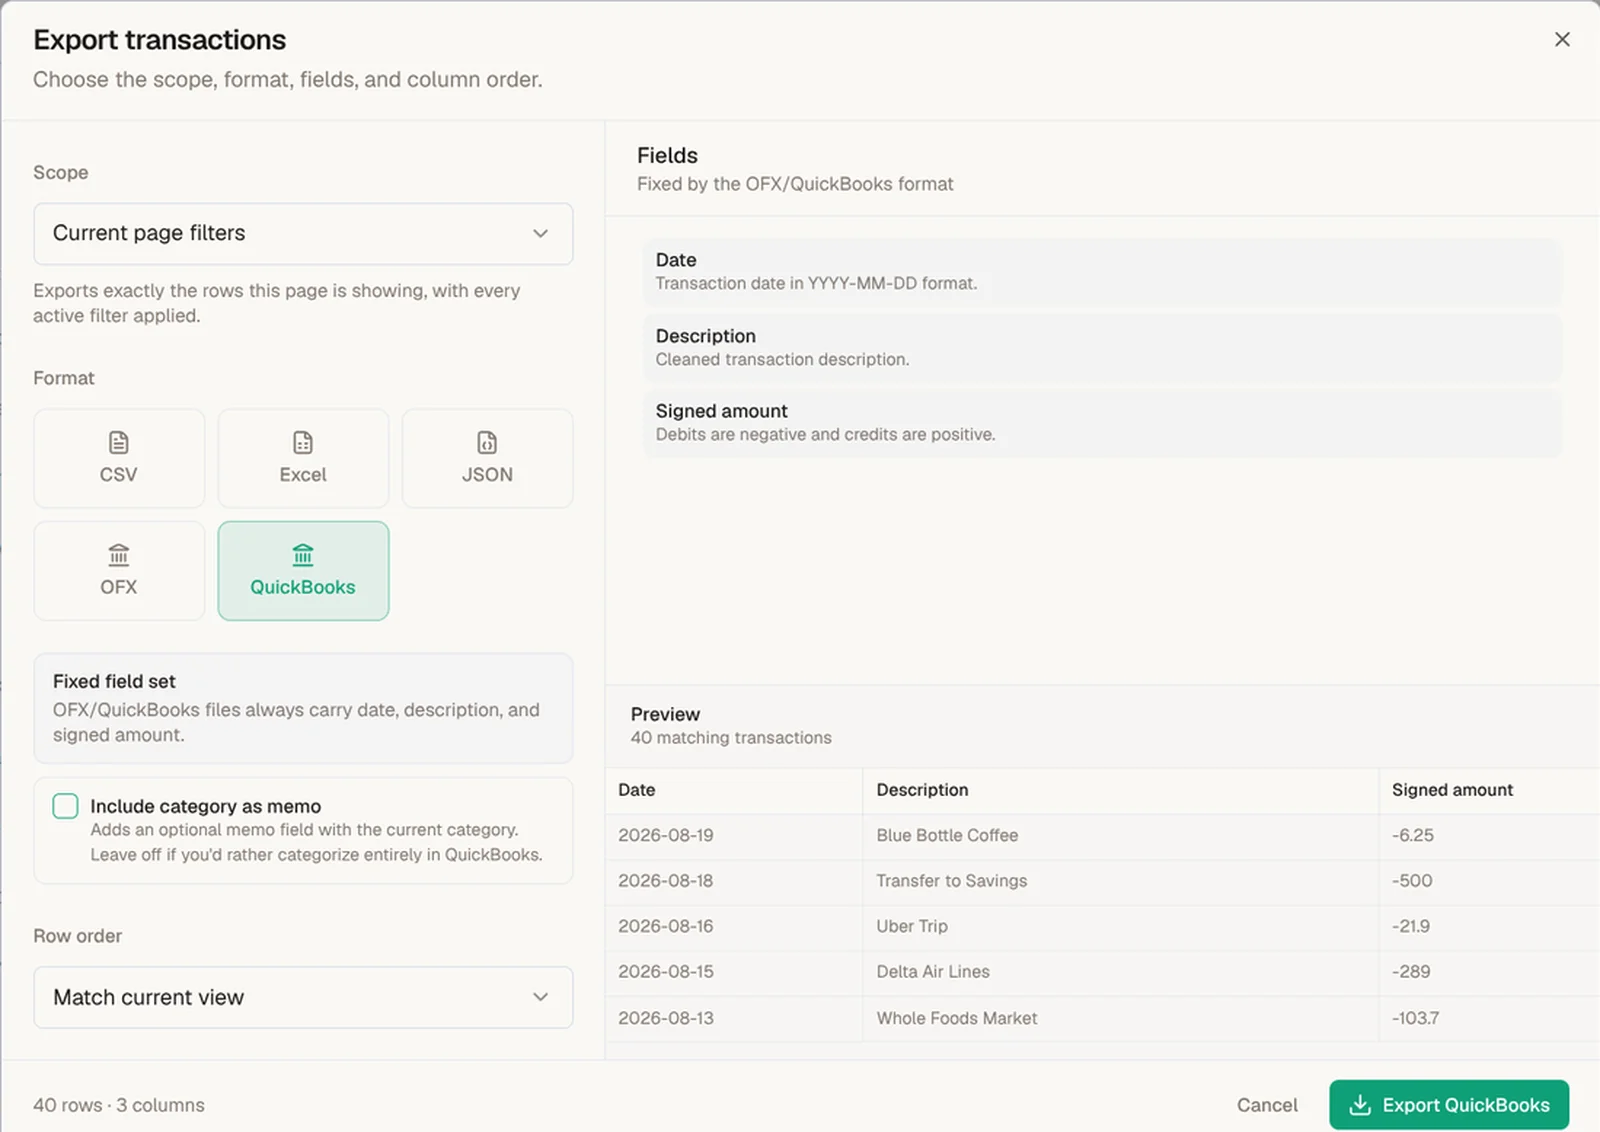
The "Include category as memo" toggle is worth turning on if you'd rather QuickBooks show your BankFlow category as a memo note, and off if you're planning to categorize entirely inside QuickBooks after import. Either way, download the file, you'll need it in the next step.
Step 2a: Import into QuickBooks Online
Go to Transactions, then Bank transactions. Click the dropdown next to Link account and choose Upload from file. Select the file BankFlow just generated, click Continue, then choose the QuickBooks account it should land in. Because BankFlow already exports the fixed date/description/amount schema QuickBooks Online expects from a QBO or QFX file, there's no column-mapping screen to fill in, that step only appears for CSV uploads with arbitrary columns.
Step 2b: Import into QuickBooks Desktop (Web Connect)
In QuickBooks Desktop, go to Banking → Bank Feeds → Import Web Connect Files, and select the .QBO file from BankFlow. Choose an existing QuickBooks account or create a new one, then click Continue. Your transactions land in the bank feed for that account, ready for review the same way a downloaded bank feed would be.
Check Your Result
In either QuickBooks Online or Desktop, the imported transactions should show the same dates, descriptions, and amounts you saw in BankFlow's export preview. QuickBooks Online lists them under For review; QuickBooks Desktop lists them in the account's bank feed. Neither is posted to your books yet; you still review and accept them inside QuickBooks.
Common Problems
QuickBooks Desktop won't import the file. Confirm you're signed in to an Intuit Account inside the desktop app first, Web Connect imports fail silently without it.
Transactions landed in the wrong account. Undo the import in QuickBooks and re-run it, picking the correct account this time. BankFlow's export doesn't know which QuickBooks account you intend, that choice happens entirely on the QuickBooks side.
QuickBooks says the file format is invalid. Make sure you exported as QuickBooks or OFX from BankFlow, not CSV. A CSV export needs QuickBooks Online's strict 3- or 4-column format to work as a manual upload; the QuickBooks/OFX export sidesteps that entirely.
Some transactions look like duplicates after import. QuickBooks attempts to auto-match imported transactions against ones already in your books. Review matches in the For Review tab before accepting rather than assuming every row is new.
Next Step
For the full walkthrough of BankFlow's export dialog, formats, and presets, see how to export your BankFlow transactions.
Sources
QuickBooks Online steps per Intuit's Manually upload transactions into QuickBooks Online. QuickBooks Desktop Web Connect steps per Intuit's Set up or edit bank accounts for Bank Feeds in QuickBooks Desktop. Reviewed August 20, 2026.